Showing posts with label Vegetables. Show all posts

Tuesday, 23 April 2013

Japanese curry

Japanese curry is a perfect example of a dish that doesn't originates in Japan, but which is so adapted to Japanese taste that it now be called a true Japanese meal.
A quick history lesson on Japanese curry teaches us that it was introduced into Japan late 19th century by the British, who of course were introduced to this meal by the Indians (India was a British colony at that time). After WOII the dish became very popular in Japan, and can now by ordered at one of the many Japanese curry restaurants and made a home through instant curry packages available at every supermarket. The taste of Japanese curry is now completely different from the Indian variant; it's sweeter, milder and the sauce is normally thicker.

Using widely available instant packages preparing Japanese curry becomes very, very easy to make; and all the different brands and variations ensure that everyone can buy the curry to best fit their own taste and preferred level of spiciness.

Instant packages will be in the form of either curry roux or curry powder. And you can choose which to use depending on your own preference. Normally we prefer to use curry roux, because you don't have to worry about measurements.
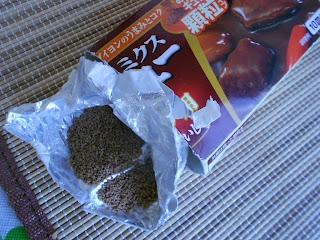
Curry powder

Curry blocks

Curry is normally served with white rice and a traditional curry has the following ingredients (2 persons):

  • 200gr beef (small pieces)
  • half onion
  • 1 carrot
  • 2 (small/medium sizes) peeled potatoes

1) Cut the vegetables and potatoes, and stir-fry the beef and onion in a fry-pan. (until beef has turned brown)

2) Add the carrot and potatoes and add water (check your instant curry package to see how much you will need, normally around 200-250ml) and let it simmer.

3) Then, add the instant curry (either curry roux or curry powder)

4) Let is simmer for about 5 - 10 minutes and serve with white rice

However, you can make curry with any ingredients you want! That makes it one of my favourite recipes to use up any left-overs in the refrigerator! We will share some of our favorite recipes later.


Friday, 8 March 2013

Yaki udon with sesame dressing

Sesame dressing adds a great taste to any salad, but recently we have been trying it in different recipes. Inspired by Japanese cooking programs on television (very entertaining!), we have discovered some great new uses for sesame dressing. It can really give a simple meal an interesting flavour. This time we want to share our absolute favourite sesame dressing recipe: yaki udon with sesame.


Ingredients (2p):

  • udon (2 portions for medium eaters, 3 if you are really hungry)
  • sesame dressing
  • Vegetables (pick anything you like or have left over in your fridge), we used:
    • 1 back of bean sprouts
    • 1 (small) broccoli (boil before you start the rest of the cooking)
    • 100 gr mushrooms
Our ingredients: bean sprouts, udon, (already boiled) broccoli, mushrooms
Video instructions....


or written instructions.:

First, the udon needs the be boiled according to instructions on the label. Normally a couple of minutes in boiling water.
 
boiling the udon
In the meantime you can heat some oil in a fry-pan, and stir-fry the bean sprouts and mushrooms for a couple minutes


Then, add the broccoli and mix together.


Add in the udon, mix together, and then add sesame dressing to taste.


And, you are already finished! Easy, and delicious!

Enjoy!


Friday, 25 January 2013

Soy fried Mushrooms


You can buy a great variety of mushrooms in Japan, and they can be used for a great variety of recipes. One of our favorite mushrooms is the shiitake-mushroom. However, the recipe we are preparing today can easily be made using any kind of mushroom you like.

Today's recipe is for a side dish of mushrooms, stir-fried in soy sauce. Very nice to add some onions and finish it with sprinkled sesame seeds on top.

Ingredients (2p):

  • Your own favorite mushrooms for 2 persons
  • Soy sauce (around 4 tbsp)
  • Optional: extra flavoring, for example half onion and/or sesame seed
First, wash the mushroom and cut them in desired size pieces (really, any size you like is good for this recipe). Also cut the onion in small pieces.

Heat some oil in a fry pan and fry the onions for a couple minutes. Then, add the mushrooms and fry again for a couple of minutes.

Add the soy sauce in the pan. And let it simmer until the mushrooms turn into the brown soy sauce color. The liquid should have (almost) completely disappeared from the pan.

Serve on a plate, and add some sesame seeds on top. Very easy, tasteful and healthy side dish.

Saturday, 20 October 2012

Simmered Kabocha (Japanese pumpkin)

Now that is has become autumn, and with Halloween getting near, we just had to make some pumpkin recipes! We still love our Kabocha  cookies recipe, but we also wanted to try some new recipes.
This time, we tried 'simmered kabocha'.
Ingredients (2p):
  •  1/2 kabocha (Japanese pumpkin)
  •  circa 180 ml water
  • 2 tbsp sugar
  • 2 tbsp soy sauce

Cut the kabocha into small cubes.


In a pan, mix together the water, soy, and sugar and bring to boil. When it boils, add the pumpkin pieces and turn down the heat. Now let the pumpkin simmer for about 15 minutes.


 Serve with rice for a light lunch, or eat as a side dish. This dish has a perfect taste for cold autumn days.


Monday, 1 October 2012

Seasoned boiled Okra

We see packages of Okra all around in Japanese supermarkets, and although it is not a Japanese vegetable, it can be used in many Japanese style cooking. For example, try adding it to a Japanese style curry! But this time we want to share a recipe of a Japanese side dish that uses Okra. It's ridiculously easy to prepare, so there is no reason not to try it. Seasoned boiled Okra can easily be adjusted to your own taste, and is a very nice side dish by any (rice) meal.


Ingredients (2p):

  • 1 bag okra
  • Soy sauce
  • Bonito flakes (Katsuobushi)
  • (optional) fresh grated ginger 
Japanese bag of Okra
First, boil the okra for a couple of minutes.

Boiling
Cut off the top and bottom, and throw those away. Cut the remaining of the okra into small pieces.

Add the bonito flakes (kutsuobushi) on top, add soy sauce and (if you like) the fresh grated ginger, and mix together.


And your side dish is already ready to serve, very easy and quick!

Tuesday, 18 September 2012

Nasu Dengaku

Nasu Dengaku (or Eggplant broiled with miso) is one of the many Japanese recipes that combines both eggplant and miso paste. The two tastes go very well together, and make for a very delicious combinations. We have already posted some recipes that featured eggplant and/or miso-paste, and this time we will focus on Nasu Dengaku. It is a delicious, and also makes for a very nice looking side-dish.

Ingredients (2p):
  • 2 tbsp miso paste
  • 1 tbsp soya
  • 1 tbsp suiker
  • 3 tbsp mirin
  • 2 eggplants 

View the 'how to make'-video...

... or read the instructions with the photo's:

Cut the eggplants in halves lengthwise, and put them in the broiler (or oven) until soft. In our broiler it took approximately 5 minutes on 200 degrees.

Cut eggplant
Eggplant in the broiler
 While the eggplant is in the broiler, mix the miso paste, soya sauce, mirin and sugar together. It will become a smooth, brownish mixture.

Miso mixture

When the eggplant has become soft, get them out of the broiler. Put miso-sauce-mix on the insides of the eggplants, and sprinkle with sesame seeds.


Eggplant with miso-sauce and sesam seeds, ready to get back in the broiler
 Put back into the broiler until the miso-sauce starts bubbling and the sesame seeds turn brown (should be around the same time). Serve as a side dish (preferably by a rice dish), and enjoy!

Nasu Dengaku, broiled eggplant with miso


Friday, 17 August 2012

Stir-fried goya with eggs

Now that the summer is getting warmer and warmer, it's time to try some seasonal recipes specially for hot days! This time we bought a goya (bitter melon), a vegetable that looks like a strange cucumber with bad skin, but tastes very different! It's has an extreme bitter taste, so beware when buying/tasting.

It's full of vitamins and therefore very healthy, and it is said that it helps your body withstand the heat of the summer. Most recipes with goya come from Okinawa, Japan's most southern region, so they should know what works best against the heat.

This time we tried making a simple variation of Chanpuru, a stir-fried dish from Okinawa that normally contains vegetables, tofu, and/or some meat. It is very often made with goya, which is therefore (not surprisingly) called 'goya chanpuru'. Because is has such a bitter taste, we prefer not to eat a whole meal of it, but rather prepare it as a side dish.


Ingredients (2p):

  • 1/2 Goya
  • clove of garlic
  • 2 eggs
the outside of the goya

Cut the goya in half lengthwise, and remove the inside and seeds with a spoon. Then, slice the goya thinly.

Goya slices, with seeds removed
 Heat some oil in a fry-pan. Add the goya slices, and season with pressed garlic. Fry until the goya softens. Then, add two eggs to the mixture, and stir till the eggs are baked.


Stir-fried goya with egg
Serve, on a plate. If the taste is still to bitter, it can help to add (a little bit of) mayonnaise, because that will soften the taste. It also took us a while to get used to the taste, but once that happens it actually tastes quite good.
Now you are ready to survive the summer heat :)

Monday, 30 July 2012

Steamed eggplant with mayo-miso

Combining our Japanese study and our wish to try some new Japanese foods, we decided to study some Japanese cook books in the library! Ok, we will admit, sometimes the recipes were a little hard to follow/read, so we just use our own imagination and taste to complete the recipes and fill in the blanks :)

During this process of reading, and trying we have come to make some nice dishes of our own. This time we want to share a recipe that combines the joint love of the Dutch and Japanese for mayonnaise! While we Dutch are known for putting mayonnaise on everything, the Japanese also use it as topping on many recipes. (who would want to eat Okonomiyaki without mayonnaise??) This recipe is for steamed eggplant with a mayo-miso sauce! In the Japanese kitchen eggplant is combined with miso in a lot of recipes, but we liked this recipe for it's full, creamy taste the mayonnaise adds.


Ingredients (2p):
  • 1 (big) eggplant
  • 2 tbsp mayonnaise
  • 1 tbsp (red) miso paste
 Cut the eggplant is slices of around 1 cm thick. And steam the slices for about 10 - 15 minutes. (In our previous recipe we described how you can steam easily with just simple kitchen tools: pan with lid and a colander)

In the meanwhile, mix the mayonnaise and the miso paste. You might want to taste a bit and adjust the ratio to your preferred taste. Too much mayo can make the taste too fatty, but too much miso will make it too salty.

Put the steamed eggplant slices on a plate and add the mayo-miso sauce mix on top. Very easy, but tastes great!

Steamed eggplant with mayonnaise and miso sauce


Saturday, 21 July 2012

Pumpkin (kabocha) cookies

This time we want to share a recipe that can be enjoyed in many different ways! It's nice to eat as a snack, a great taste and healthy cookie. But we also enjoy it very much to eat as a side dish in our bento boxes. Easy to make a bunch of cookies and then take them with you on several days.


Ingredients:
  • half Japanese pumpkin (we have never tried it with non-Japanese pumpkin, so we don't know if it will work just as good)
  • flower
  • topping: sesame seeds
Japanese pumpkin

Remove the seeds from the pumpkin (easily with a spoon), and cut them to small pieces. Let them cook for about 10 minutes.

Cut into pieces

Cooking
Put the cooked pumpkin pieces in a bowl and add the flower. You will need enough flower so that the flower mixed (smashed) together with the pumpkin will feel very soft and kneadable. We normally use around 7 (big) table spoons of flower to reach this. But you can just try and add more flower till you're satisfied with the result.

Cooked pumpkin

Result of mixing the cooked pumpkin pieces with flower
Then, make round flat shaped cookies from the pumpkin-flower mix. It will be much easier if you keep your hands wet, so it doesn't stick to your fingers to much. Add sesame seeds on top, and make sure stick to the cookie.

Put on over roster (maybe use a sheet of baking paper first!)
Put them in the oven, and bake them till they turn a little brown. In our oven, it takes approximately 10-15 minutes on 200 degrees C.
Baking the cookies
'How-to-make' video :)


 Let them cool down, and enjoy!


Monday, 18 June 2012

Simmered daikon

Daikon is a big white, but mildly flavoured, Japanese radish. It actually looks like a big, white carrot, and Daikon literary means 'big root' in Japanese. We had actually no experience at all cooking with radish, so even though we saw Daikon for sale at all supermarkets we had never bought one. We didn't know what to do with it. Eat it raw? cook, fry or broil? However, we were feeling experimental and wanted to try something new. So we bought a daikon and tried some daikon recipes we heard taste very good. And indeed, we have come to love daikon

One (very big) daikon
This time we want to share a favourite daikon recipe of ours, Japanese Simmered Daikon. This recipe makes for a great side dish, but is also nice to be enjoyed as a warm snack on cold winter days.

Daikon is apparently really healthy, and we heard it is even a great remedy against hangovers! We haven't tried it ourselves, but please let us know if you find this actually works.

Ingredients (2p):

1/2 daikon
1 tbsp dashi powder
1 tbsp mirin
2 tbsp soya sauce

First, peel the skin off the daikon and slice it to pieces of approximately 1 cm thickness. Then, cut these pieces to quarters.


Daikon cut to pieces
Fill a fry pan with approximately 0,75 cm water, and mix the water with the dashi powder (1 tbsp), mirin (1 tbsp) and soya sauce (2 tbsp). Put on the heat, and bring it to boil.
Then, add the daikon pieces to the pan, and divide evenly on the water. Lower the heat, and cover the pan with a lid and let it simmer for about 30 minutes. After 15 minutes you can turn the daikon pieces, so both sides simmer evenly.

Daikon pieces added to the pan
Simmer with lid
 After about 30 minutes (or when all the water in the pan is gone) your simmered daikon is ready!

Finished simmered daikon (no water left)
 Serve and enjoy!

Japanese simmered daikon

You can view the cooking process on our youtube channel!


Tuesday, 29 May 2012

Omelet Rice (Omurice)

 
A recipe that is very popular with kids (and with us!) is omurice (オムライス) or Omelet Rice. We usually eat it for lunch but since it's quite a filling meal you can also prepare it for dinner. Like the name suggests, this recipe is a fusion between an omelet and rice. The distinctive presentation style makes it an icon of Japanese cooking, and it looks pretty cool too! It takes about 15-20 minutes in the kitchen and you only need a little skill to make it look really good. So where do we start?

Ingredients (2p):
  • Any mix of vegetables you like, this time we used:
    • 1 small broccoli
    • 4 big mushrooms (shiitake)
    • carrot
  • white rice for 2 persons (normally; 1 cup of rice makes 2 servings) 
  • ketchup  
  • For the omelets:
    • 1 tbsp soy sauce 
    • 2 tbsp mirin
    • 1 tbsp sugar
    • 4 eggs
Omelet Rice can be made with al kind of ingredients and you can experiment with different vegetables. It is very good meal to use some left-over vegetables from you refrigerator! We like to eat this meal vegetarian, but you can easily change that and add chicken to ingredients. Feel free to do whatever you like but keep in mind that all has to fit in your egg roll in the end :).

Preparation:

Prepare the white rice in your cooker or pan. The rice will be fried afterwards so make sure it's not too sticky or wet. Cut your vegetables and boil the broccoli and carrots for +/- 5 minutes (or other vegetables you use that need boiling to prepare).

2/3 of the carrot was already boiling, but this should give you an idea of how much ingredients you need
When the broccoli and carrots are almost done, heat some oil in the frying pan and fry the mushrooms. (Here you can substitute for other vegetables or chicken) Pour off your boiled vegetables and add them to the mushrooms. Stir fry for 2-3 minutes then put it on low heat while you prepare the omelet.


Put 4 eggs in a cup and add 2 tblsp mirin, 1 tblsp soy sauce and 1 tbsp of sugar. Be careful not to add more because your omelet might become to thin. The mirin gives the omelet a nice even light yellow color, while soy sauce adds a little salty taste and the sugar makes it a little sweet. Stir and divide into two portions

Of course, if you find this too much of a hassle you can leave the mirin, soy sauce and sugar out, and just make a normal omelet. However, we do think the taste of the original omelet does give this recipe that little extra to enjoy!

The omelet with soy sauce and mirin

 Now it's time to add the rice and ketchup to the vegetables and mix together, stir fry for 2-3 minutes.

Add ketchup to your own taste

Presentation

Step 1: To present the omurice in the typical Japanese way, put the edge of the omelet in the middle of the plate.

Edge of the omelet is in the middle of the plate
  
Step 2: fold the omelet and put some more ketchup on top.


Step 3: enjoy!