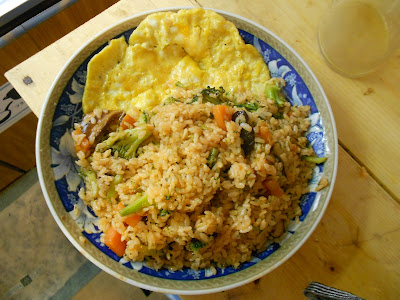
Showing posts with label Rice. Show all posts

Tuesday, 23 April 2013

Japanese curry

Japanese curry is a perfect example of a dish that doesn't originates in Japan, but which is so adapted to Japanese taste that it now be called a true Japanese meal.
A quick history lesson on Japanese curry teaches us that it was introduced into Japan late 19th century by the British, who of course were introduced to this meal by the Indians (India was a British colony at that time). After WOII the dish became very popular in Japan, and can now by ordered at one of the many Japanese curry restaurants and made a home through instant curry packages available at every supermarket. The taste of Japanese curry is now completely different from the Indian variant; it's sweeter, milder and the sauce is normally thicker.

Using widely available instant packages preparing Japanese curry becomes very, very easy to make; and all the different brands and variations ensure that everyone can buy the curry to best fit their own taste and preferred level of spiciness.

Instant packages will be in the form of either curry roux or curry powder. And you can choose which to use depending on your own preference. Normally we prefer to use curry roux, because you don't have to worry about measurements.
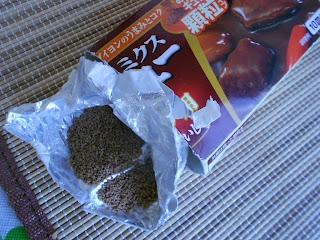
Curry powder

Curry blocks

Curry is normally served with white rice and a traditional curry has the following ingredients (2 persons):

  • 200gr beef (small pieces)
  • half onion
  • 1 carrot
  • 2 (small/medium sizes) peeled potatoes

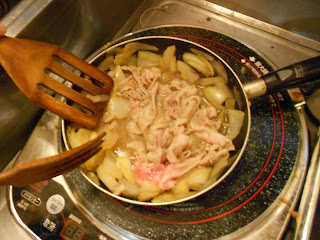
1) Cut the vegetables and potatoes, and stir-fry the beef and onion in a fry-pan. (until beef has turned brown)

2) Add the carrot and potatoes and add water (check your instant curry package to see how much you will need, normally around 200-250ml) and let it simmer.

3) Then, add the instant curry (either curry roux or curry powder)

4) Let is simmer for about 5 - 10 minutes and serve with white rice

However, you can make curry with any ingredients you want! That makes it one of my favourite recipes to use up any left-overs in the refrigerator! We will share some of our favorite recipes later.


Saturday, 19 January 2013

Mapo Tofu

Originally Mapo Tofu is not a Japanese recipe. It originates in China, but -as with many Japanese recipes that find there origin elsewhere in the world- it has been fully incorporated into the Japanese kitchen and adapted to the Japanese taste. It is served in many (Chinese) restaurant in Japan, and it is often made by people themselves at home. The fastest and easiest way to make Mapo Tofu is to use the instant packages, sold in much varieties at all Japanese supermarkets. We however find that it is much better tasting to make it completely yourself. It is not difficult or much time-consuming at all, so why settle for the taste of instant versions.

Mapo Tofu is a spicy dish that combines ground meat and tofu. The different textures of the meat and the tofu make this a delicious meal. If you want, you can easily adjust the spice level to you own liking, but traditionally it is served quite spicy.

Ingredients (2p):

  •  200 gr ground meat
  • 1 package of tofu
  • rice for 2 persons
sauce:
  • 2 tbsp miso paste
  • 1 tbsp soy sauce
  • 2 tbsp mirin
  • 1 tbsp sugar
  • 100 ml water
  • 0,5 tbsp doubanjiang (adjust amount to you own desired level of spicyness)

 Fry the ground meat in the pan (no need to add oil).  Optionally add some salt and pepper for seasoning.

Mix the miso paste, soy sauce, mirin, sugar and water together and add in the pan, and bring to boil.

Lower the heat and add the tofu (cut into pieces)


Now add the doubanjiang. Start with small amounts, try the taste, and add more if desired.

Serve with rice, and enjoy!


Monday, 6 August 2012

Gyudon


Gyudon is a very popular dish in Japan. You can get a standard bowl  for about 380 yen at one of the big chains in almost every street in Japan. Since these restaurants are often open 24 hours, it is a dish not only popular for people seeking a fast an cheap meal, but also a popular midnight snack for those coming back from late work or drinking.

Gyu means 'cow', and 'don' means (rice) bowl, so it's a recipe for rice topped with (simmered) beef, served with a mildly sweet sauce and unions, and often topped with pickled ginger. Although the Gyudon shops will mostly be considered selling 'fastfood', it is actually a quite healthy meal. But, of course we do not always want to eat out when we feel like eating gyudon, so we searched for ways to prepare it ourselves. Very easy, and tastes just as good (or even better!) than the Gyudon served in the numerous gyudon-shops. And much cheaper too :).

Ingredients (2p):
  • Rice for 2 persons
  • around 250 gram thinly sliced beef
  • 1 onion
  • 200 ml water mixed with 1 tbsp dashi powder
  • 2 tbsp soy sauce
  • 2 tbsp mirin
  • optional for topping: ginger and sesame seeds.
    Usually benishoga (pickled red ginger) is used, however, we prefer to use fresh grated ginger as topping.
First, cut the onion in wedges and cut the beef in thinly, slim slices. And cook the rice as usual.


Then, is a small fry-pan, mix the dashi-stock (200 ml water mixed with dashi powder) with the soy sauce and the mirin, while bringing it to simmer. Add the onion pieces and let them simmer for a couple of minutes. Lastly add also the beef, mix together with the onions and let the total simmer for a couple minutes until the beef has gained it's light-brown colour.
Simmering the onion wedges

Mixing in the beef

Divide the rice into two bowls, and add the beef-onion and sauce on top. Now for topping, grate fresh ginger (feel free to just use the more traditional pickled red benishoga) and add on top and spread some sesame seeds.
Home-made Gyudon

You have made your own bowl of gyudon, no need to visit the Gyudon restaurants anymore. Enjoy!

'How to' video:

Monday, 9 July 2012

Satsuma-imo gohan (Sweet potato rice)

Our school has started again, so we spend our days in the classroom and/or in the library. This means that we normally don't have time to eat lunch at home. Therefore, we bought some nice lunch-chopsticks with holders, and have started making a lot of bento-meals. So, from now we will probably start sharing some of our favourite take-with-us recipes.

  Usually we prepare these meals before we go to school, so they have to be real easy and quick to make. This recipe, Satsuma-imo gohan or sweet potato rice, is exactly that. You only need a rice cooker and some time to wait until it is finished cooking.

Satsuma-imo are Japanese sweet potatoes, with a purple skin and yellow-ish inside. It has a really nice, sweet taste. We have even seen (and tasted) it as a ice cream flavour!

Japanese sweet potatoes (Satsuma-imo)


Ingredients (2p):
  • White rice for 2 persons
  • 2 average sized sweet potatoes
  • 3 tbsp mirin
  • topping: sesame seeds
We have seen recipes for this meal using different kinds of rice, but since we normally only have plain white style rice we just use that and it tastes good! However, for some variation in taste, you can try making it with (combinations of ) different kinds of rice.

Wash the sweet potatoes and cut them in small pieces. Put the rice in the rice cooker, and place the sweet potato pieces on them. Add water (just use the amount you would normally use for the amount if rice) and the mirin (3 tbsp) then cook as usual.

Sweet potatoes cut into small pieces
The rice (below, not visible on photo) with potato pieces on top and with water added to cook
When it has finished cooking, divide into two portions and place on a plate or put in your lunch-box. Add sesame seeds on top for the finishing touch (in both look and taste!)

Result when rice cooker has finished cooking
Easy, and delicious!

Satsuma-ima gohan - Sweet potato rice


Wednesday, 20 June 2012

Okayu

Recently we discovered some new functions on our (already so useful) rice cooker. We can now use it to make even more recipes in a very quick and easy way!
The recipe we want to share today is Okayu, or Japanese rice porridge. We found it is incredibly easy to make using the 'おかゆ'-setting (okayu), or porridge-setting for international cookers. This traditional Japanese recipe is usually made by parents to give to their children when they are sick. However, adults also make it for themselves when they feel under the weather. The porridge can also be eaten as a Japanese-style breakfast, and we have found it makes a very good start of the day.
Right now we are studying for our Japanese tests and we like to make this recipe to eat while studying. It makes for a nice, filling meal: gives you energy but easy to digest.

Ingredients (2p):
(for basic okayu, lots of variations possible!)

  • 1 cup rice
  • 5 cups water
Wash the rice thoroughly and put it in the rice cooker, then add 5 cups of water. Put the rice cooker on 'okayu'-setting and just turn on.
From our experience it takes our cooker approximately 1 hour to finish cooking. However for the best result and taste, it is better to let the rice (when the rice has finished cooking) stand for a while in the still warm rice cooker. When we make this recipe for breakfast, we turn the rice cooker on before we go to sleep, so when we wake up it is finished and ready to eat!
Then, just divide it into two cups and enjoy! This time we added a little sugar on top, to give it a little sweetness.

Japanese Okayu
There are lots of great variations possible for this recipe, we keep trying and experimenting with different ingredients and toppings, and will share our results later!

Saturday, 9 June 2012

Oyakodon (Chicken-and-egg rice)

 This time we made a dish with a really interesting name: Oyakodon. It means parent-child rice bowl because it uses both the chicken and the egg. Although the recipe sounds like something Hannibal Lecter would eat, it actually tastes really good!

The recipe comes from our Japanese language book 'Minna no Nihongo' and is used to show how you can say 'do this according to these instructions'. Good students as we are, we took that literally and started cooking straight away. Though the basics are still 'Minna no Nihongo'-style, we made some slight improvements in the ingredient ratios. This dish is really easy to make, very low in fat and super tasty. Kids love it and parents too ;). Oh, and it has the coolest name ever!

What do we need?

Ingredients (2p):
  • Rice for 2 persons
  • 250 ml water
  • 1 tblsp dashi
  • 3,5 tblsp soy sauce
  • 2 tblsp mirin
  • 1,5 tblsp sugar
  • 1 chicken filet
  • 1 onion
  • 2 eggs
First cut the chicken in thin long strips. Then cut the onion in wedges. To make wedges you first cut the onion horizontally in half and then cut each half in quarters (or just chop the onion up :-P).

The chicken and onion cut into pieces
Then mix the water, dashi, soy sauce, mirin and sugar and pour the mixture into a preferably small fry pan. Bring to a boil and add the chicken and onion. Both should be covered in liquid. Now bring down the heat to a simmering. After 6-7 minutes your broth should be ready but make sure the chicken is thoroughly cooked.


The chicken and onion simmering in the dashi-mixture

Beat two eggs and pour them evenly over the simmering broth. Put a lid on the frying pan and let nature take its course for 2 minutes.

Two beaten eggs divided over the simmering broth, cover with lid
In the meanwhile you can put the rice in your bowls. Uncover the frying pan, divide the broth and onions onto the bowls and put the chicken with egg on top of the rice. You are now ready to go Hannibal Lecter!

Video review:


End result:

Tuesday, 29 May 2012

Omelet Rice (Omurice)

 
A recipe that is very popular with kids (and with us!) is omurice (オムライス) or Omelet Rice. We usually eat it for lunch but since it's quite a filling meal you can also prepare it for dinner. Like the name suggests, this recipe is a fusion between an omelet and rice. The distinctive presentation style makes it an icon of Japanese cooking, and it looks pretty cool too! It takes about 15-20 minutes in the kitchen and you only need a little skill to make it look really good. So where do we start?

Ingredients (2p):
  • Any mix of vegetables you like, this time we used:
    • 1 small broccoli
    • 4 big mushrooms (shiitake)
    • carrot
  • white rice for 2 persons (normally; 1 cup of rice makes 2 servings) 
  • ketchup  
  • For the omelets:
    • 1 tbsp soy sauce 
    • 2 tbsp mirin
    • 1 tbsp sugar
    • 4 eggs
Omelet Rice can be made with al kind of ingredients and you can experiment with different vegetables. It is very good meal to use some left-over vegetables from you refrigerator! We like to eat this meal vegetarian, but you can easily change that and add chicken to ingredients. Feel free to do whatever you like but keep in mind that all has to fit in your egg roll in the end :).

Preparation:

Prepare the white rice in your cooker or pan. The rice will be fried afterwards so make sure it's not too sticky or wet. Cut your vegetables and boil the broccoli and carrots for +/- 5 minutes (or other vegetables you use that need boiling to prepare).

2/3 of the carrot was already boiling, but this should give you an idea of how much ingredients you need
When the broccoli and carrots are almost done, heat some oil in the frying pan and fry the mushrooms. (Here you can substitute for other vegetables or chicken) Pour off your boiled vegetables and add them to the mushrooms. Stir fry for 2-3 minutes then put it on low heat while you prepare the omelet.


Put 4 eggs in a cup and add 2 tblsp mirin, 1 tblsp soy sauce and 1 tbsp of sugar. Be careful not to add more because your omelet might become to thin. The mirin gives the omelet a nice even light yellow color, while soy sauce adds a little salty taste and the sugar makes it a little sweet. Stir and divide into two portions

Of course, if you find this too much of a hassle you can leave the mirin, soy sauce and sugar out, and just make a normal omelet. However, we do think the taste of the original omelet does give this recipe that little extra to enjoy!

The omelet with soy sauce and mirin

 Now it's time to add the rice and ketchup to the vegetables and mix together, stir fry for 2-3 minutes.

Add ketchup to your own taste

Presentation

Step 1: To present the omurice in the typical Japanese way, put the edge of the omelet in the middle of the plate.

Edge of the omelet is in the middle of the plate
  
Step 2: fold the omelet and put some more ketchup on top.


Step 3: enjoy!

Sunday, 27 May 2012

Mushroom Rice (Kinoko Gohan)

The first recipe we want to share with you, is Japanese mushroom rice (Kinoko gohan). We just tried this recipe ourselves last weekend and loved it! It is very easy to make, takes a little preparation time and after that you just wait till you can enjoy a nice meal.


Ingredients (2p):
  • mushrooms (300 gr)
  • 6 tbsp soja
  • 4 tbsp mirin
  • white rice for 2 persons (1 cup of rice, makes 2 cups of rice serving)
  • dashistock (we use instant-dashi powder)
You can use any variation of mushrooms for this recipe. This time we used Bunashimeji and Shiitake, but the recipe tastes very good with different kinds of mushrooms too.
The Bunashimeji (right) and Shiitake (left) used in the Mushroom Rice

Preparation
Cut the mushrooms into smalls pieces and put them in a big bowl. Add the soja (6 tbsp) and mirin (4 tbsp) to the mushrooms and firmly mix together.

The result of the mixed mushrooms with soja and mirin
In the meanwhile, wash the rice as normal. Take the amount of water you will need to cook your rice (This will depend on the rice you are using. Typically, this will be in the ratio 1 cup of rice: 2 cups of water) and mix this with the dashi-powder. We used a small tbsp amount of dashi-powder to get the desired light-brown coloured water.

Put the rice and the dashistock (the result of water mixed with the dashipowder) in the rice cooker. Add the mushroom evenly on top of the rice, and cook the rice as usual. The nice smell of mushrooms will soon fill your kitchen while you're waiting for your meal to finish cooking.

The mushrooms added on top on the rice in the rice cooker

When finished, mix the rice and the mushrooms together and divide on plates. Optionally, it tastes very good seasoned with sesame seeds.


The finished Mushroom Rice, enjoy!

It tasted very good, and makes for a great lunch or light dinner. It's also very easy to put in a bento (lunch) box, to take with you and enjoy some place else.