One of the most famous Japanese chicken recipes, is Chicken Katsu. Not surprisingly, you can order it many small restaurants and it is often put into bento boxes. During our last vacation to Shibu Onsen we ordered some chicken katsu at a small (little run-down) restaurant owned by an very friendly old man. Because the restaurant had a half-open kitchen we were able to see some of the cooking. And when he brought us our meals (really big), and we tasted it, it was really good! Definitely one of the best Chicken Katsu we had ever eaten. So, because we wanted to eat it again (and Nagano is a bit far for Tokyo) we decided to try and make it ourselves.
Ingredients (2p):
300 gr chicken breasts*
pepper and salt
1 egg (beaten)
bread crumbs
frying oil
* you can also use pork or beef, then you will get respectively tonkatsu or beefkatsu, also very nice!
Preparation
First you need to pound the chicken breast until they are approximately 1 a 1,5 cm thick.
Then, you need to prepare to egg and bread crumbs. Beat the egg, and place it in a shallow bowl. In another shallow bowl, place a handful of bread crumbs
beaten egg
bread crumbs
Season the chicken on both sides with salt and pepper to taste, dip it briefly in the beaten egg , and press it in the bread crumbs so the chicken breast is covered (both sides) with crumbs. Repeat for the other chicken breasts.
Heat around 0,5 cm of oil in a fry-pan. Put the chicken in the fry-pan and let it cook in the hot oil until the outside has a nice brown colour. Turn the chicken halfway through the cooking.
Chicken Katsu with rice
Serve it as side dish, or serve it with rice (and lettuce) as Chicken Katsu-don. Tastes best when topped with tonkatsu sauce.
Originally Mapo Tofu is not a Japanese recipe. It originates in China, but -as with many Japanese recipes that find there origin elsewhere in the world- it has been fully incorporated into the Japanese kitchen and adapted to the Japanese taste. It is served in many (Chinese) restaurant in Japan, and it is often made by people themselves at home. The fastest and easiest way to make Mapo Tofu is to use the instant packages, sold in much varieties at all Japanese supermarkets. We however find that it is much better tasting to make it completely yourself. It is not difficult or much time-consuming at all, so why settle for the taste of instant versions.
Mapo Tofu is a spicy dish that combines ground meat and tofu. The different textures of the meat and the tofu make this a delicious meal. If you want, you can easily adjust the spice level to you own liking, but traditionally it is served quite spicy.
Ingredients (2p):
200 gr ground meat
1 package of tofu
rice for 2 persons
sauce:
2 tbsp miso paste
1 tbsp soy sauce
2 tbsp mirin
1 tbsp sugar
100 ml water
0,5 tbsp doubanjiang (adjust amount to you own desired level of spicyness)
Fry the ground meat in the pan (no need to add oil). Optionally add some salt and pepper for seasoning.
Mix the miso paste, soy sauce, mirin, sugar and water together and add in the pan, and bring to boil.
Lower the heat and add the tofu (cut into pieces)
Now add the doubanjiang. Start with small amounts, try the taste, and add more if desired.
With the winter coming (although we still have some nice warm days in autumn) it will be time to make some delicious Japanese winter dishes. Oden is a typical Japanese one-pot winter dish, in which all ingredients are slowly simmered in the soup. Preparation-time is very fast, but the dish will also require at least 30 minutes (more likely 40) waiting time.
Ingredients (2p):
1/3 daikon, peeled and cut into 3/4 inch pieces
2 boiled eggs, peeled
1 atsuage (deep fried tofu), cut into large slices
2 or 3 ganmodoki (fried tofu fritters), cut into halves
5 chikuwa (tube-like fish paste cakes), cut into pieces
hanpen (surimi fish cake), cut into triangles
for the soup:
700 ml water
2 tsp dashi powder
2 tbsp mirin
4 tbsp soy sauce
1 tbsp sugar
Feel free to change the ingredients; add some potatoes (peeled) and konnyaku, substitute for other tofu or fish paste cakes.
First step is the preparation: boil the eggs (around 5 minutes) and peel them. Cut all other ingredients as listed above.
Then, take a big fry pan and mix the ingredients for the soup together. Place the rest of the ingredients in the soup (do it the Japanese way and group the ingredients together). Bring to a boil, then turn down the heat and put on the lid, then let it simmer for about 30-40 minutes. (the daikon should have become soft) Make sure you do not run out of soup, else add some extra dashi-water and soy sauce.
In part I of the gyoza update, we shared how to make your own gyoza. Now, in part II, we will share the best way to prepare gyoza
(home-made or store-bought), so you can enjoy them to the fullest.
Ingredients:
Gyoza
oil for frying
Raw gyoza
Heat some oil in a fry-pan, and add the gyoza. Fry them until the bottom turns brown(ish).
Add gyoza in the fry-pan
Then add some water, so there will be a low layer of water in the water
(around 1/3 of the height of the gyoza), and lower the heat till medium.
Add a lid on the fry-pan, and let the gyoza simmer until all the water
has evaporated.
Add some water, and let the gyoza simmer with lid on the fry-pan
When all the water has evaporated, remove the gyoza from the pan, and serve with some soy sauce dip. Enjoy!
We love eating gyoza, but -we will admit- up until now we would just buy ready made packages in the supermarket so we only needed spend a little time preparing them. But, since we like gyoza so much, we figured we should also try making them completely ourselves. And it was a big success! They tasted sooo much better than the store-bought ones, we even got to love eating gyoza even more :)
Home made gyoza
So, this time we want to share our favourite recipe for gyoza. And also, in part II of this update, we will share the best way to prepare gyoza (home-made or store-bought), so you can enjoy them to the fullest.
Ingredients (makes 30 gyoza):
200 gr ground pork
1/4 cabbage
2 tbsp soy sauce
clove of garlic
grated fresh ginger
pinch of salt
30 gyoza wrappers
(Optional) equipment:
Gyoza mold (used to fold the gyoza)
Our gyoza mold
We sometimes end up having to much filling to put in all in the gyoza. But, not to worry, it makes also for delicious meat balls you can enjoy the day after. On another note, you can make gyoza without the gyoza mold, just use your hands the fold the gyoza together en push to let it stick. Maybe it will not look perfectly, but it's the taste that counts of course!
Cut the cabbage in small pieces, boil for a couple of minutes, and make sure all excess water is removed.
boiling the cabbage
Then, in a bowl, mix the ground pork together with the garlic, ginger,
salt, soya sauce. At last add the cabbage to the mixture and mix.
gyoza filling all mixed together
Take the gyoza mold, and put a gyoza wrapper on top. Place a spoonful of filling in the wrapper, and close to mold to seal the gyoza.
spoonful of filling...
...put into the wrapper...
...and closed to seal the gyoza
Repeat this process 30 times, for 30 delicious gyoza
all 30 gyoza filled
For more clarification see our instructional-video:
One of our favourite Japanese meals is Okonomiyaki: Japanese pancake or Japanese pizza, or maybe more like Japanese omelet. No matter how you describe it, Okonomiyaki is delicious!
There are many variations in the Okonomiyaki recipe, the two main 'styles' come from two different regions in Japan: Osaka style & Hiroshima style. When we were travelling through Japan we took the opportunity to try both styles in their original area. And both are insanely delicious. Basically, Osaka style mixes all the ingredients together in one think pancake, while Hiroshima style cooks the ingredients in different layers on top of each other and adds some noodles to the recipe. Then there are endless variation on filling of your okonomiyaki: beef, pork, shrimp and/or other seafood, etc. You can try many differences!
This time we will share our recipe of the Osaka style Okonomiyaki: all mixed together to form on big pancake. We decided to make it a shrimp okonomiyaki, but fill free to substitute that with other ingredients you like.
Ingredients (2p):
100 gr flour
160 ml water mixed with dashi powder
2 eggs
300 gr cabbage
For the filling (can be substituted for other flavours):
150 gr shrimps
For topping:
(Kewpie) mayonnaise
Okonomiyaki sauce (or you can use Tonkatsu sauce or Worcester sauce)
Bonito flakes (Katsuobushi)
The video guide:
Mix the flour, dashi-water and eggs together.
Cut the cabbage in small long pieces (approximately 3 cm by 0,5 cm).
Add the slices cabbage to the batter and mix together.
Add shrimps, and mix together.
Heat some oil in a small fry-pan, divide the Okonomiyaki-batter in two portions and put the first portion in the fry-pan. Do the shaping on low fire and make sure the ingredients are well spread over the pancake/omelet. Bake on medium fire until it becomes a firm structure (takes about 6-8 minutes).
Then comes the hard part: turning it over. You can try doing it how it is supposed to be: flipping it over with a big spatula. It never really works for us. We end up with lots of small disintegrated pieces of Okonomiyaki. Therefore, we found a perfect, and easy way. Take another fry-pan, and just turn the okonomiyaki over into this other fry-pan. Much easier. (see our video for clear instructions)
You can start using the first fry-pan to make the second Okonomiyaki.
When it has finished cooking, put it on a plate.
Add mayonnaise and Okonomiyaki-sauce (preferably in pretty looking stripes or other shapes :)
Gyudon is a very popular dish in Japan. You can get a standard bowl for about 380 yen at one of the big chains in almost every street in Japan. Since these restaurants are often open 24 hours, it is a dish not only popular for people seeking a fast an cheap meal, but also a popular midnight snack for those coming back from late work or drinking.
Gyu means 'cow', and 'don' means (rice) bowl, so it's a recipe for rice topped with (simmered) beef, served with a mildly sweet sauce and unions, and often topped with pickled ginger. Although the Gyudon shops will mostly be considered selling 'fastfood', it is actually a quite healthy meal. But, of course we do not always want to eat out when we feel like eating gyudon, so we searched for ways to prepare it ourselves. Very easy, and tastes just as good (or even better!) than the Gyudon served in the numerous gyudon-shops. And much cheaper too :).
Ingredients (2p):
Rice for 2 persons
around 250 gram thinly sliced beef
1 onion
200 ml water mixed with 1 tbsp dashi powder
2 tbsp soy sauce
2 tbsp mirin
optional for topping: ginger and sesame seeds. Usually benishoga (pickled red ginger) is used, however, we prefer to use fresh grated ginger as topping.
First, cut the onion in wedges and cut the beef in thinly, slim slices. And cook the rice as usual.
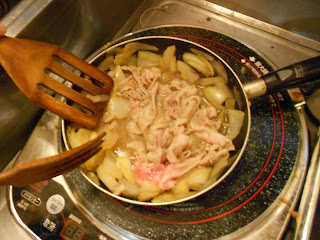
Then, is a small fry-pan, mix the dashi-stock (200 ml water mixed with dashi powder) with the soy sauce and the mirin, while bringing it to simmer. Add the onion pieces and let them simmer for a couple of minutes. Lastly add also the beef, mix together with the onions and let the total simmer for a couple minutes until the beef has gained it's light-brown colour.
Simmering the onion wedges
Mixing in the beef
Divide the rice into two bowls, and add the beef-onion and sauce on top. Now for topping, grate fresh ginger (feel free to just use the more traditional pickled red benishoga) and add on top and spread some sesame seeds.
Home-made Gyudon
You have made your own bowl of gyudon, no need to visit the Gyudon restaurants anymore. Enjoy!
Recently we posted a recipe with Satsuma-imo (Japanese sweet potato's) prepared in the rice cooker: Satsuma-imo gohan (or sweet potato rice). However, we found that Japanese sweet potato's can be prepared deliciously in many different ways. Because our local supermarket has recently had the Satsuma-imo on sale a couple of times we decided to try some other ways of preparing our favourite Japanese potato.
Today we want to share how to make steamed satsuma-imo, very easy but tastes very good and it is actually a very healthy way to prepare the sweet potato's (or food in general). This time we decided to mix the sweet potato with banana and honey, to complement the sweetness and give it a more fruity taste to make the satsuma-imo nice into a recipe for the summer!
Ingredients (2p):
2 small satsuma-imo (or 1 big one)
2 banana's
honey as a topping
rice for 2 persons
We like to serve our steamed meal with rice, but if you prefer otherwise you can of course substitute the rice with anything you like. Otherwise, just cook the rise as usually.
Satsuma-imo, Japanese sweet potato
Cut the sweet potato into big pieces, you can make them around 3cm square. Steam the pieces for about 15 minutes.
We don't have any special steamer, so we just use simple basic kitchen tools: pan with lid and a colander with a diameter a little bigger than the pan (so you can hang the colander in the pan, without it touching the bottom). Put a little bit of water in the pan (around 1 cm), so that when you hang the colander in the pan it won't touch the water and bring to boil. Put the potato's in the colander and hang it in the pan, then place the lid on the pan. Then, all you have to do is wait 15 minutes (maybe check that the water isn't evaporated)
Cut the banana's in pieces and place together with the steamed potato on a plate. Add honey to taste, and mix all together. Serve with rice, and enjoy you sweet, fruity satsuma-imo dish!
Now that is has become July, the weather is getting warmer and warmer in Toyko. We have therefore come to love to eating cold meals, to cool down a little bit from the heat outside. With the more warmer periods yet to come, we expect to grow even more fond of these Japanese cold meals.
This time we want to share a favorite meal of us: cold soba. Soba noodles are buckwheat noodles, and can be eaten both cold and warm. Because we enjoy eating cold soba so much, we searched on the internet to find the recipe for the Japanese cold dipping sauce (Kaeshi) that is normally served with cold soba. Turned out: it is very easy to make and very tasty!
Making the dipping sauce (Kaeshi)
Ingredients (makes several portions, can be stored in refrigerator)
2 cups soja
1/3 cup mirin
1/4 cup sugar
Put the 1/3 cup mirin in a pan, and bring to boil. Lower the temperature, so it can simmer for a little bit. Then add the 1/4 cup sugar (if you prefer a more sweeter sauce, you can try adding more sugar), and stir until all the sugar is melted. Finally, add the 2 cups of soya sauce and let the sauce warm up. When it starts boiling, take is off the heat.
Let is cool down, and then store it in the refrigerator. It will make several portions, but put in a airtight container it can be stored for quite some time.
Put the sauce in a small cup, so you can dip the noodles in.
Making the soba
Ingredients (2p:)
200 gr. soba (will normally be packed in 1-persons portions of 100 gram so very easy!)
Making cold soba noodles is really easy (maybe that's why we like this meal so much?). Put water in a pan and bring to boil. Then, carefully add the soba noodles to the pan, and divide them in the water. Let the noodles boil for the amount of time as indicated on the label (probably around 5 or 6 minutes).
Now comes the most important part of cooking soba noodles. After it's done cooking, you need to wash the noodles thoroughly in cold water. After that it's ready to serve.
Traditionally we see cold soba served on beautiful bamboo plates/mats, but since we don't have those we just use our basic plates. Still tastes good!
This time we made a dish with a really interesting name: Oyakodon. It means parent-child rice bowl because it uses both the chicken and the egg. Although the recipe sounds like something Hannibal Lecter would eat, it actually tastes really good!
The recipe comes from our Japanese language book 'Minna no Nihongo' and is used to show how you can say 'do this according to these instructions'. Good students as we are, we took that literally and started cooking straight away. Though the basics are still 'Minna no Nihongo'-style, we made some slight improvements in the ingredient ratios. This dish is really easy to make, very low in fat and super tasty. Kids love it and parents too ;). Oh, and it has the coolest name ever!
What do we need?
Ingredients (2p):
Rice for 2 persons
250 ml water
1 tblsp dashi
3,5 tblsp soy sauce
2 tblsp mirin
1,5 tblsp sugar
1 chicken filet
1 onion
2 eggs
First cut the chicken in thin long strips. Then cut the onion in wedges. To make wedges you first cut the onion horizontally in half and then cut each half in quarters (or just chop the onion up :-P).
The chicken and onion cut into pieces
Then mix the water, dashi, soy sauce, mirin and sugar and pour the mixture into a preferably small fry pan. Bring to a boil and add the chicken and onion. Both should be covered in liquid. Now bring down the heat to a simmering. After 6-7 minutes your broth should be ready but make sure the chicken is thoroughly cooked.
The chicken and onion simmering in the dashi-mixture
Beat two eggs and pour them evenly over the simmering broth. Put a lid
on the frying pan and let nature take its course for 2 minutes.
Two beaten eggs divided over the simmering broth, cover with lid
In the
meanwhile you can put the rice in your bowls. Uncover the frying pan,
divide the broth and onions onto the bowls and put the chicken with egg
on top of the rice. You are now ready to go Hannibal Lecter!